10 Daily Yogas for Better Life
Yoga is a group of physical, mental, and spiritual practices or disciplines which originated in ancient India and aim to control (yoke) and still the mind, recognizing a detached witness-consciousness untouched by the mind (Chitta) and mundane suffering (Duḥkha). There is a wide variety of schools of yoga, practices, and goals in Hinduism, Buddhism, and Jainism, and traditional and modern yoga is practiced worldwide. The ultimate goals of yoga are stilling the mind and gaining insight, resting in detached awareness, and liberation . This goal varies by philosophical or theological system. In the classical Astanga yoga system, the ultimate goal of yoga is to achieve samadhi and remain in that state as pure awareness.
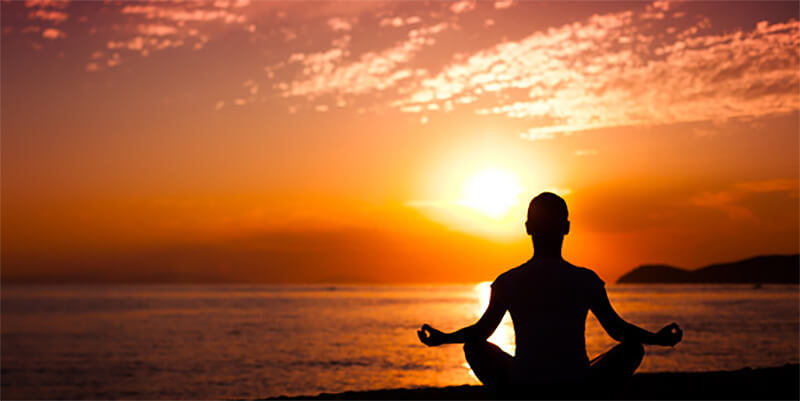
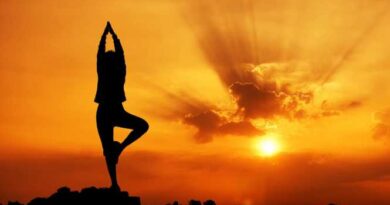
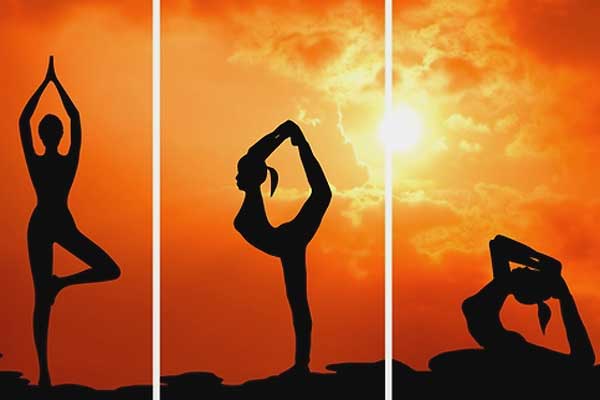
There are many great reasons to add yoga to your exercise routine. Yoga improves muscle tone, flexibility, and balance, and it helps you relax and reduce stress, thanks in part to its signature pranayama breathing. Research have also shown that yogic practices also reduce stress, anxiety, depression, and chronic pain; help you sleep better; and enhance overall well-being and quality of life. Morning yoga can help you kickstart your day on a fit note. And it can help you feel more energetic and regain body-mind balance. Here is a beginner’s guide to 10 expert-recommended asanas.
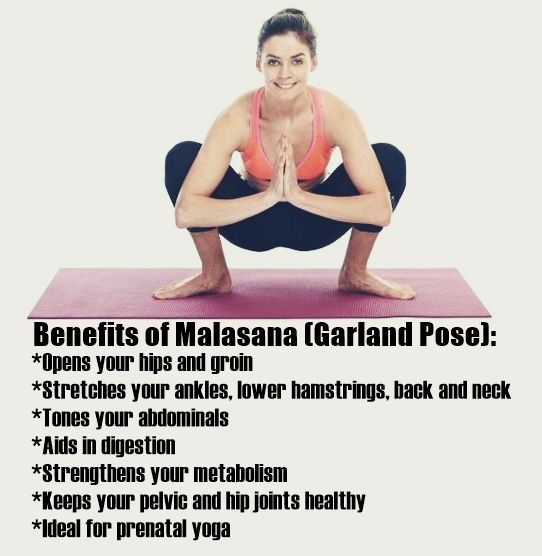
1. Malasana (Garland Pose)
Malasana improves balance, concentration, and focus. It can also increase circulation and blood flow in the pelvis, which can help regulate sexual energy. It is particularly good for pregnant women as it can later help in childbirth. Malasana releases the lower back, opens the hips, and turns the practitioner into a cute little nugget.
How to do ?
- Come to stand with your feet about mat’s width apart.
- Bend the knees and lower your butt toward the floor to come into a squat.
- It’s natural for your toes to want to turn out and that’s OK, but don’t overdo it. Eventually, you’re working toward keeping the feet closer to parallel.
- Take your upper arms inside your knees and bend the elbows to bring the palms together into anjali mudra (prayer position).
- With hands to your heart center in anjali mudra, see if you can allow your thumbs to touch your sternum as if to help keep the chest lifted. Continue pressing upper arms into thighs and thighs into upper arm to stay engaged.
- Keep your spine straight, your butt moving toward the floor, and your shoulders relaxed away from your ears.
- Stay here for five breaths, then straighten the legs to come out. You can come directly into a Forward Fold if you like.
- Try repeating the pose three times to take full advantage of getting warmed up. If you are practicing at home, it’s fine to do some other poses in between your squats.
Benefits
Garland Pose opens the hips and groins as it stretches and strengthens the feet and ankles.
While squatting comes naturally to children and is used as a resting position in many places on Earth, most adults in the First World have gotten out of the habit. So far out of the habit, in fact, that they find squatting extremely uncomfortable for their hips and feet. Garland pose is an effective way to counter the tightness you get from spending too much time sitting in chairs.
2. Chaturanga Dandasana (Four–Limbed Staff Pose)
Chatur means four; anga means limbs; Danda means staff (here, it refers to the spine of the body); asana means pose. It is pronounced as cha-thur-anga Dhan-daa-sana. This pose is frequently practiced as part of the Surya Namaskar or Sun Salutation pose.
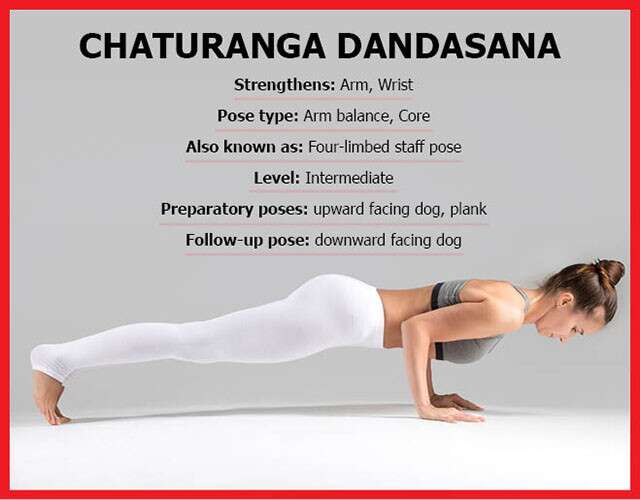
Chaturanga is one of the most common postures in Vinyasa yoga—but also one of the most abused. Students tend to rush this pose, cheating its alignment, which with repetition can lead to injury.
How to do ?
- Sit in vajrasana.
- Walk your hands forward and come in plank pose (dandasana) with your hands under your shoulders.
- Straighten your legs, till they are a few inches above the ground and parallel to it, with your toes turned inwards.
- On exhalation, bend your elbows until your shoulders are at the same height as your elbows.
- Exhale. Come up to plank pose. Exhale.
- Sit in vajrasana.
Benefits
- This asana strengthens the wrists, arms, and shoulders.
- It also helps straighten the spine, and strengthen the back and abdominal muscles.
- It helps keep the body aligned, maintaining core stability.
- It helps increase stamina. Sportspersons do the plank pose as part of cooling down exercises after playing
3. Utthita Trikonasana (Extended Triangle Pose)
Utthita Trikonasana, or extended triangle pose, is a yoga pose based on triangle pose. Extended triangle is great for either beginner or a more advanced yogis, and can benefit both your physical and mental health. It is a glorious way to release your lower back, strengthen your core, and expand your body (and mind).

How to do ?
- Engage your right thigh muscles and draw your right femur into its socket. Extend your right hand toward the front of the room, keeping your right hip tucked.
- Lower your right hand down, onto your shin or ankle. If you are more open, bring your right hand to the floor on the inside or on the right foot. Do whichever one feels most comfortable.
- The left shoulder stacks on top of the right one as you open your chest, reaching your left fingertips toward the ceiling while keeping your left shoulder rooted in its socket.
- Turn your head to take your gaze up toward your left fingertips. If this is uncomfortable for your neck, it’s also fine to keep the head in a more neutral position.
- Continue to draw your right thigh muscles upward, deepening the crease in your right hip.
- Soften your right knee slightly to prevent hyperextension. (This is called a microbend.)
- Stay for at least 5 breaths.
- Repeat the pose with your left leg forward.
Benefits
- Triangle Pose strengthens the legs and stretches the groin, hamstrings, and hips, and opens the chest and shoulders.
- It also challenges— and improves—balance and stability.
4. Anjaneyasana (Crescent Lunge)

Crescent Lunge ( Anjaneyasana) is a dynamic standing yoga pose that utilizes and integrates the muscles in your entire body. It stretches and strengthens the lower and upper body, while creating stability and balance. Its name comes from the Sanskrit words “anjaneya” (meaning “praise” or “salutation”) and “asana” (meaning “pose”). Because of this, it is sometimes referred to as “Salutation Pose,” and it is performed many times during Sun Salutation C.
How to do ?
- From a low lunge, drop your back knee (the left knee, in this case) to the mat. If your knee is sensitive, you can place a blanket under your knee or double up your yoga mat for more cushioning.
- Bring your hands onto your right knee and your right knee directly over your right ankle.
- Inhale and raise your arms above your head, keeping the arms in line with your ears.
- To deepen into the lunge press firmly into your feet as you allow your hips to shift forward. As you do, your left thigh comes closer to the floor. To support engagement and to avoid sinking into the joints, hug your inner thighs in towards one another to create adduction.
- You may take the upper spine into a backbend if that feels comfortable.
- Exhale to release the hands down, reframe the front foot, and release the pose.
- Repeat on the left side.
Benefits
- Crescent Lunge stretches the legs, groin, and hip flexors, while also opening the front torso, chest, and shoulders.
- It strengthens and tones the thighs, hips, and butt, while the balancing aspect helps to develop flexible stability.
- Considered a balance pose, backbend, and heart opener, Crescent Lunge helps the front of the body to expand, which increases energy and reduces fatigue.
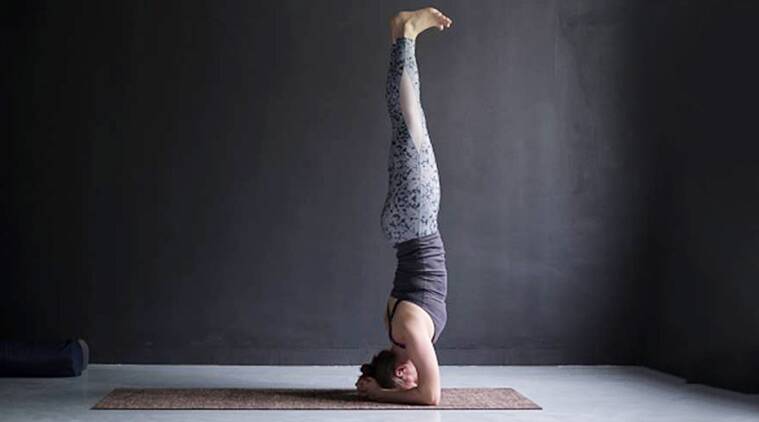
5. Salamba Sirsasana II (Supported Headstand)
Salamba sirsana II, or supported headstand II (often referred to as tripod headstand), is a pose for the more advanced yoga practitioner as it demands the ability to maintain the balanced posture of tadasana (mountain pose) while completely inverted. Salamba sirsana II is a relatively simple pose to maintain, but getting into the pose can be a challenge for students with tight hamstrings. Students with cervical spine injury or instability will need to practice head-free handstand
How to do ?
- Sitting on the heels in vajrasana (diamond or rock) pose, bring your hands to floor in front of you. Place the hands shoulder-width apart and spread fingers wide.
- Place the crown of your head on the floor far enough in front of your hands that the elbows bend to 90 degrees.
- Curl your toes under and lift your hips as in dolphin pose.
- Begin to walk your toes forward to lift your hips over your shoulders. You can remain in the preparatory position, or you might bring your knees to rest on your elbows if you feel the spine is long with hips over shoulders.
- If you feel steady, with no sense of pain or compression on the neck, and if you are breathing easily here, begin to bring your knees toward your chest, then gradually extend your feet toward the ceiling.
- Come out with the same care you took entering the pose, slowly lowering your feet to the floor or your knees to elbows.
Benefits
- The challenge of supporting the weight of the body over the head not only strengthens deep postural muscles of the core, but it reveals postural compensation patterns, and provides an opportunity to bring more balance to the body.
- A properly aligned headstand can be strengthening for the cervical spine as bone cells respond to site-specific pressure by increasing bone density.
- The positional shift of abdominal organs when practicing inversions can improve digestion and breathing.
- All full inversions increase venous return of blood from the lower body and promote lymphatic flow through the lower body.
- Many students find advanced postures to be particularly centering, as they are required to focus to maintain the position.
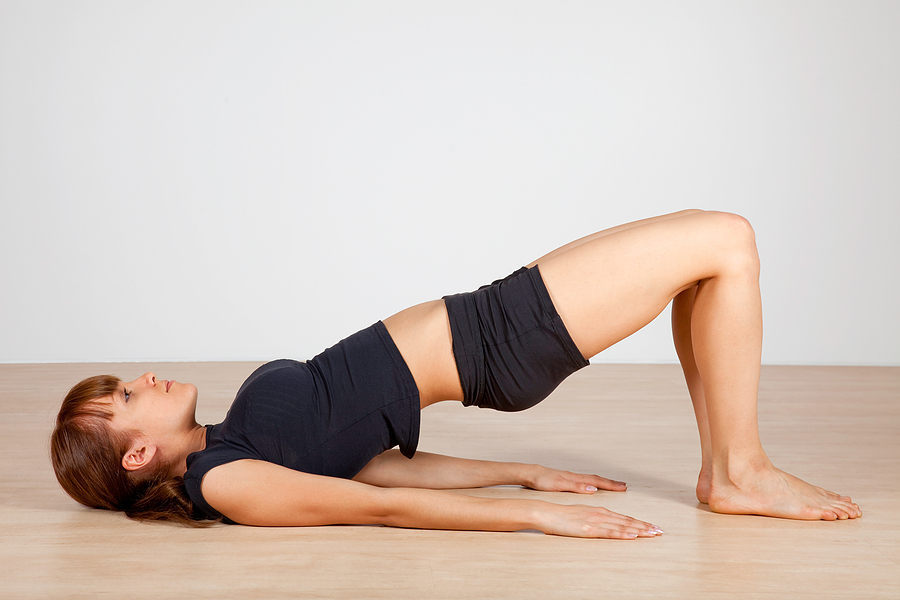
6. Salamba Setu Bandha Sarvangasana (Supported Bridge Pose)
Setu Bandha Sarvangasana, also known as the Bridge Pose or Setubanda,is an inverted back-bending asana. The meaning of the term Setu Bandha Sarvangasana is derived from Sanskrit words ‘Setu’ meaning bridge, ‘Bandha’ meaning to lock, ‘Sarva’ meaning all, ‘anga’ meaning limbs, and ‘asana’ meaning posture. Setubanda is an intermediate level pose that’s often used to prepare the body to perform other advanced yoga asanas.
How to do ?
- Lie on your back in the center of your mat with your knees bent, your legs and feet parallel and hip-distance apart.
- Move your feet closer to your buttocks. Press down firmly through both of your feet and inhale to raise your hips, lifting from the pubic bone rather than the navel.
- Clasp your hands under your back on the floor. Broaden your collarbones and get on top of your shoulders. Firm the outer shins and roll your upper thighs inward. Press down firmly through your heels and lift the back of your thighs and the bottom of your buttocks even higher while keeping the thighs parallel.
- To finish, exhale, release your hands, and lower to the floor. Allow your back to rest in a neutral state as you observe the spaciousness within your chest.
Benefits
- Bridge Pose improves posture and counteracts the effects of prolonged sitting and computer work.
- It may help relieve low back pain and can counteract slouching and kyphosis (abnormal curvature of the spine).
- The pose gently stretches your abdomen, chest, and the area around your shoulders while strengthening your back muscles, buttocks (glutes), thighs, and ankles.
7. Ustrasana (Camel Pose)
Ustra = Camel : Asana = Posture or Pose
Ustrasana is an intermediate level back-bending yoga posture known to open Anahata (Heart chakra). This yoga posture adds flexibility and strength to the body and also helps in improving digestion.
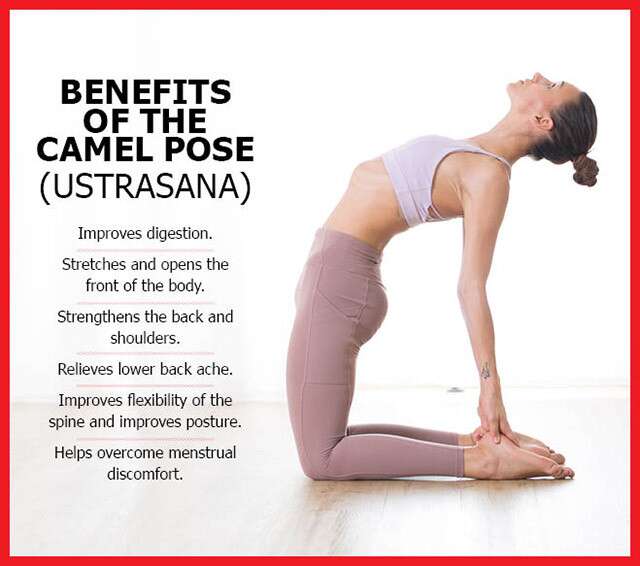
How to do ?
- Kneel on the yoga mat and place your hands on the hips.
- Your knees should be in line with the shoulders and the sole of your feet should be facing the ceiling.
- As you inhale, draw in your tail-bone towards the pubis as if being pulled from the navel.
- Simultaneously, arch your back and slide your palms over your feet till the arms are straight.
- Do not strain or flex your neck but keep it in a neutral position.
- Stay in this posture for a couple of breaths.
- Breathe out and slowly come back to the initial pose. Withdraw your hands and bring them back to your hips as you straighten up.
Benefits
- Improves digestion.
- Stretches and opens the front of the body. It also strengthens the back and shoulders.
- Relieves the body of lower back ache.
- Improves flexibility of the spine and also improves posture.
- Helps overcome menstrual discomfort.
8. Janu Sirsasana (Head-to-Knee Forward Bend)
Janu Sirsasana (Head-to-Knee Pose) is a full forward fold that offers a stretch from your ankle to your hips, along the full length of your back, and along the side-body as well. It can help calm your mind as well as stretch your body. As you fold forward, close your eyes and cultivate a sense of inner peace. The more you practice Janu Sirsasana, the more you will realize that the goal of this posture is not about touching your toes—it’s about slowing down, focusing on your breath, and calming your mind.
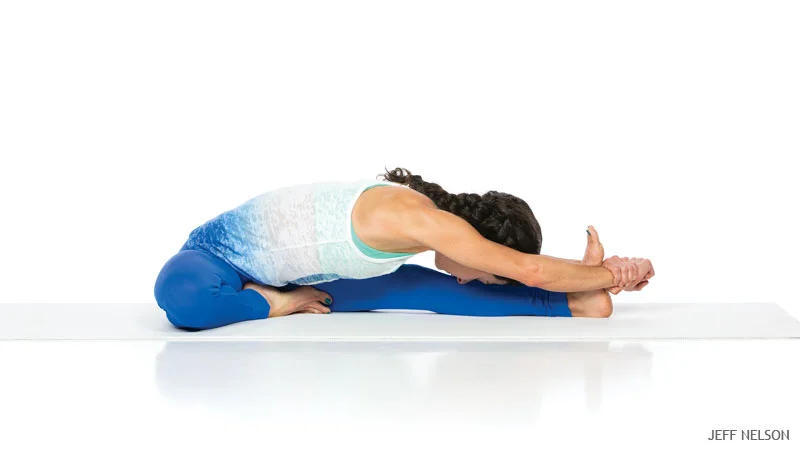
How to do ?
- Begin in Dandasana (Staff Pose). Bend your right knee and place the sole of your right foot high on your left inner thigh.
- Inhale and lengthen your spine; exhale and take your right hand to the outside of your left thigh and your left hand behind your left hip.
- On an exhalation, bend at your hips and lean forward over your left leg.
- Reach for your left foot. If it is available to you, clasp your left wrist with your right hand.
- Inhale and reach your sternum forward; exhale and revolve your right ribs toward your left knee even more.
- To exit the pose, inhale and lift your chest. Straighten your right leg, returning to Staff Pose.
- Repeat on the other side.
Benefits
- Head-to-Knee Pose improves posture and counteracts the effects of prolonged sitting.
- It can be helpful for recovery after sports and activities that include running.
- It stretches the back of your body, including your back muscles, and can help relieve low back tightness and low back pain.
- Also, it can bring calm to the mind and help with depression, anxiety, and fatigue.
9. Supta Matsyendrasana (Reclining Supported Twist)
Twists are a great way to decompress and squeeze out the anxiety and frustrations of your day — just like wringing out a sponge. They also stimulate and detoxify the organs of your torso. If you’ve ever felt worn out at the end of a workday or after a weekend of over-indulgence, Reclined Spinal Twist is a great pose to help restore balance.
In Sanskrit, the pose is called “Supta Matsyendrasana”. It’s named after an ancient yoga master, or “siddhi,” called Matseyendra. The name “Matseyendra” literally means “lord of the fishes;” so, this pose is sometimes referred to as Reclined Lord of the Fishes Pose. It is the supine (lying-down) version of the popular seated twist, Half Lord of the Fishes Pose (Ardha Matsyendrasana).
How to do ?
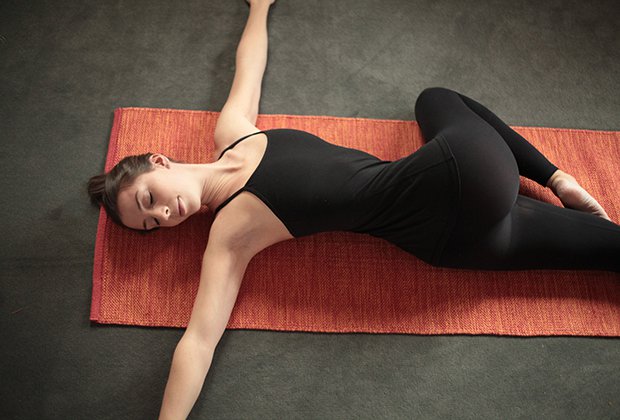
- To begin, lie on your back with your knees bent and your feet flat on the floor. You can rest your head on a pillow or blanket for extra neck support. Let your arms rest at your sides.
- On an exhalation, draw both knees to your chest and clasp your hands around them. This is Knee-to-Chest Pose (Apanasana).
- Extend your left leg along the floor, keeping your right knee drawn to your chest. Extend your right arm out along the floor at shoulder-height with your palm facing down.
- Shift your hips slightly to the right. Then, place your left hand on the outside of your right knee. Exhaling, drop your right knee over the left side of your body. Keep your left hand resting gently on your right knee.
- Turn your head to the right. Soften your gaze toward your right fingertips. Keep your shoulder blades pressing toward the floor and away from your ears. Allow the force of gravity to drop your knee even closer to the floor. If your right toes can touch the floor, allow your foot to rest.
- Hold the pose for 10-25 breaths. On an inhalation, slowly come back to center, bringing both knees to your chest in Knees-to-Chest Pose (Apanasana).
- Exhale, and extend your right leg along the floor. Repeat steps 3-6 on the opposite side.
- When you’re finished with the pose, hug your knees to your chest for a few breaths in Knee-to-Chest Pose (Apanasana). Then, slowly exhale as you extend both legs along the floor.
Benefits
- It stretches the back muscles and glutes.
- It massages the back and hips
- It helps to hydrate the spinal disks.
- It lengthens, relaxes, and realigns the spine.
- It massages the abdominal organs and strengthens the abdominal muscles. As a result, this pose tones the waistline and also helps to remove toxins.
- This twist also encourages the flow of fresh blood to your digestive organs, increasing the health and function of your entire digestive system.
10. Viparita Karani (Legs-up-the-Wall Pose)
Although “wall” is in the name, you can practice Viparita Karani anywhere that you can prop up your legs. While traditional teachers claim the pose can do everything from make “grey hairs and wrinkles become inconspicuous” to destroying old age and death, most modern teachers agree that while the benefits may not be that extreme, Viparita Karani can ease a range of ailments, including anxiety, headaches, and insomnia. It’s a perfect pose to help you unwind before going to bed.
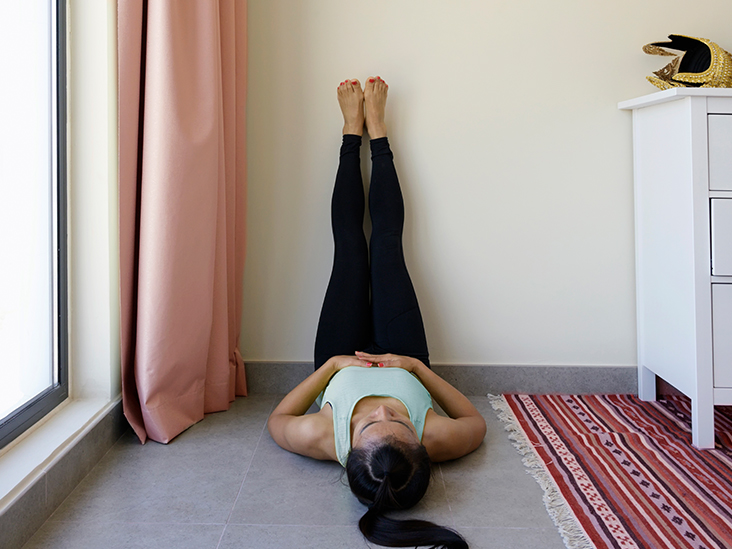
How to do ?
- Sit on the floor facing a wall. Lower your shoulders and head to the floor, lying on your side. Then roll onto your back and stretch your legs up the wall, with your feet hip-distance apart or whatever distance feels comfortable.
- Adjust your position by scooting your tailbone toward the wall. It doesn’t need to touch the wall.
- Find a comfortable position for your arms at your side, with palms turned up; relax your arms and shoulders. Relax your legs against the wall. Release all effort. You might feel your femurs sink into your hip sockets. Feel the spine lengthening. Settle into the pose and breathe for at least 10 minutes.
- To come out of the pose, bend your knees and roll to your side. Remain here for a few breaths before using the strength of your arms to slowly push yourself back up to seated.
Benefits
- Legs Up the Wall Pose is calming and relaxing.
- It improves circulation and can help reduce swelling lower extremities by redirecting lymph and other fluids from your ankles, knees, and pelvic organs to your upper body and head.
- It activates the relaxation response (parasympathetic nervous system) and deactivates the stress response (sympathetic nervous system).