Yoga Therapy – To Achieve Mindfulness and Peace
Yoga Therapy refers to the treatment of diseases by means of yogic exercises which may be physical or mental or both. The term ‘Yoga’ is derived from the Sanskrit root ‘yug’ means ‘to join’. It signifies union between the individual soul and the universal soul. It aims at obtaining relief from pain and suffering.
History of yoga
Yoga therapy has been practised in India from very ancient times. Many references to yoga have been made in the Upanishads. It was, however, Maharishi Patanjali who in about the first century B.C gave a systematic account of the traditional yogic teaching.
What are various components of Yoga ?
Yogic kriyas, asanas and pranayama constitute the physical basis of yoga. The practice of kriyas and asanas leads to excellent circulation. It promote inner health and harmony, and its regular practice helps prevent and cure many common ailments. They also help eliminate tensions, be they physical, mental or emotional.
Pranayama slows down the ageing process. In ordinary respiration, one breathes roughly 15 times a minute, taking in about 20 cubic inches of air. In pranayama the breathing rate is slowed down to once or twice a minute and the breath inhaled is deep and full, taking nearly 100 cubic inches of air.
How to perform Yoga therappy?
All yogic exercises should be performed on a clean mat, a carpet or a blanket covered with cotton sheet. Clothing should be light and loose-fitting to allow free movement of the limbs. The mind should be kept off all disturbances and tensions. Regularity and punctuality in practising yogic exercises is essential. Generally, 5 a.m to 8 a.m is the ideal time for yoga practices.
Yoga asanas and pranayama should be practised only after mastering the techniques with the help of a competent teacher. Asanas should always be practised on an empty stomach. Shavasana shound be practised for a brief period before starting rest of the exercises as this will create the right mental condition. Asanas should be performed at a leisurely slow-motion pace, maintaining poise and balance.
Kriyas
A disease-free system should be the starting ground for yogasanas and pranayama. There are six specific cleansing techniques, known as Shat Kriyas, which eliminate impurities and help cure many ailments. Of these, following four can be practised safely :-
1. Jalaneti
Most of the diseases of the nose and throat are caused by the accumulation of impurities in the nasal passage. Jalaneti is a process of cleansing the air passage of the nostrils and the throat by washing them with tepid saline water.
It should be performed only in the morning. It will relieve sore throat, cold, cough, sinusitis, migraine, headache and cases of inflammation of the nasal membranes. It keeps the head cool and improves vision.
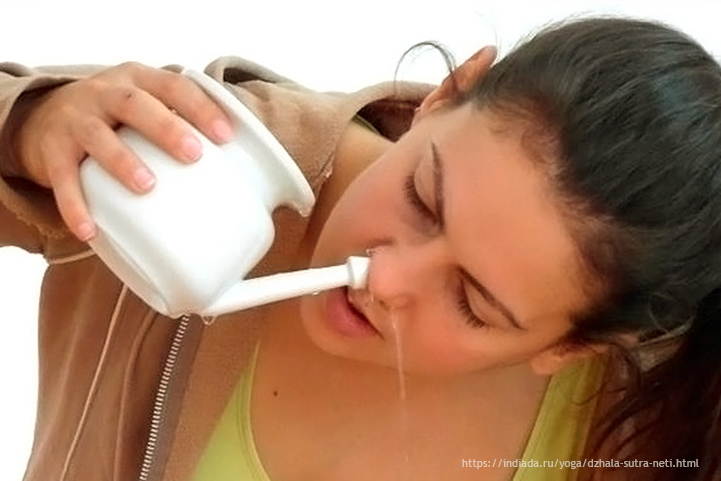
Take a clean jalaneti pot. Put half a teaspoonful of salt in the pot and fill it with lukewarm drinking water. Stand up and tilt your head slightly to the right. Insert the nozzle of the pot in the left nostril and let the water flow into it. Inhale and exhale through the mouth, allowing the water to flow out through the right nostril. Reverse this process on the other side.
2. Vamana Dhouti or Kunjal
This is a process of cleansing the interior of the stomach. It is beneficial for cleansing the stomach in cases of excessive bile, constipation and gastric troubles. Persons suffering from hyperacidity should perform kunjal with unsalted water. It gives relief from headaches, nervous weakness, chronic cold, cough and asthma. It should not be practiced by those suffering from high blood pressure, ulcers and heart troubles.

Drink four to five glasses of tepid water, with a little salt added to it, early in the morning on an empty stomach. Then stand up, bend forward, insert the middle and index fingers of the right hand into the mouth until they tough the uvula. Tickle it until you feel a vomiting sensation. The saline water thus ejected will bring up bile and other toxic material with it. Repeat the process till all the water is vomited out. This should be done once a week or as and when necessary.
3. Kapalabhati
Kapala means ‘skull’ and bhati means ‘shine’. This is a respiratory exercise for the abdomen and diaphragm. The channels inside the nose and other parts of the respiratory system and purified by this exercise. In the process, the brain is also cleared.
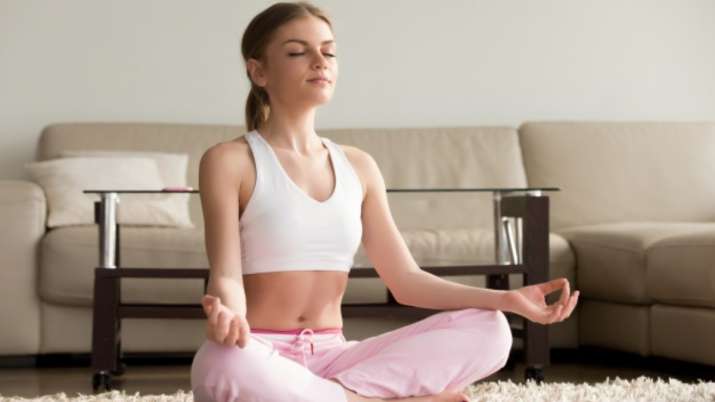
Sit in a comfortable position, preferably in padmasana. Exercise the diaphragm by exhaling suddenly and quickly through both nostrils, producing a hissing sound. Inhaling will be automatic and passive. The air should be exhaled from the lungs with a sudden, vigorous inward stroke of the front abdominal muscles. The abdominal stroke should be complete and the breath should be expelled fully. While inhaling, no wilful expansion is necessary and the abdominal muscles should be relaxed. The exercise should be done in three phases, each consisting of 20 to 30 strokes a minute. A little rest can be taken in between.
Kapalabhati enables the inhalation of a good amount of oxygen which purifies the blood and strengthens the nerve and brain centres. This kriya provides relief in many lung, throat and chest diseases like chronic bronchitis, asthma, pleurisy and tuberculosis.
4. Trataka
In yoga, four exercises have been prescribed for strengthening weak eye muscles, relieving eye strain and curing of eye disease. They are known as ‘Trataka’ which in Sanskrit means ‘Winkless gaze at a particular point’, or looking at an object with awareness.
The four tratakas are : Dakshinayjatru trataka in which, with face forewards, the eyes are fixed on the tip of the right shoulder; Vamajatru trataka, in which the eyes are fixed on the tip of the left shoulder; Namikagra trataka, in which the eyes are focussed on the tip of the nose, and Bhrumadhya trataka, in which the eyes are focussed on the space between the eyebrows.
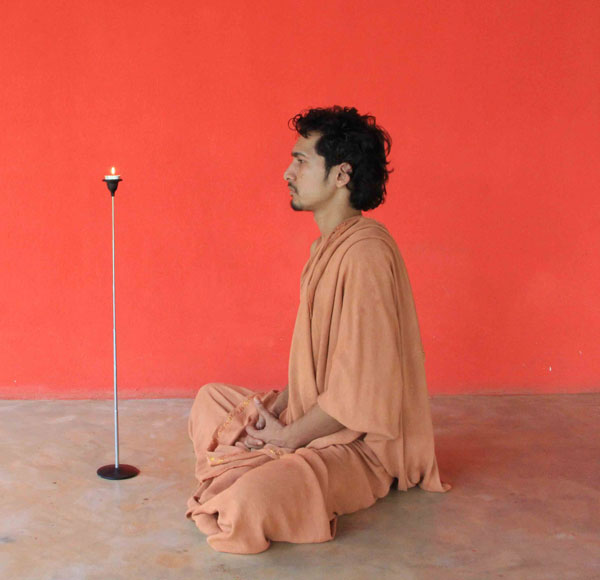
These exercises should be practiced from a meditative position like padamasana or vajrasana. The gaze should be maintained for as long as you are comfortable, gradually increasing the period from 10 to 20 and then to 30 seconds. The eyes should be closed and rested after each exercise. Persons with acute myopia should perform the tratakas with their eyes closed.
Asanas
1. Shavasana (Dead Body Pose)
This asana helps bring down high blood pressure, and relieves the mind, particularly for those who are engaged in excessive mental activity. This exercise should be done both at the beginning and at the end of the daily round of yogic asanas. During a fast, shavasana soothes the nervous system.
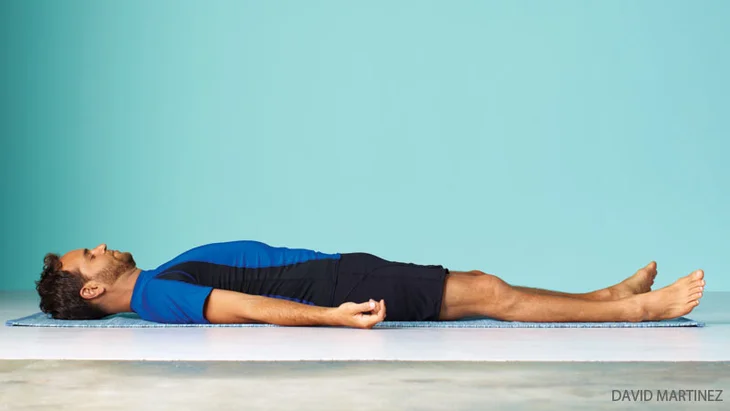
Lie flat on your back, feet comfortably apart, arms and hands extended about six inches from the body, palms upwards and fingers half folded. Close your eyes. Begin by consciously and gradually relaxing every part and each muscle of the body: feet, legs, calves, knees, thighs, abdomen, hips, back, hands, arms, chest, shoulders, neck, head and face. Relax yourself completely feeling as if your whole body is lifeless. Now concentrate your mind on breathing rhythmically as slowly and effortlessly as possible. This creates a state of complete relaxation. Remain motionless in the position, relinquishing all responsibilities and worries for 10-15 mins. Discontinue the exercise when your legs grow numb.
2. Padmasana (Lotus Pose)
Padamasana is a good pose for doing pranayama and meditation. It helps in the treatment of many heart and lung diseases and digestive disorders. It also calms and refreshes the mind.
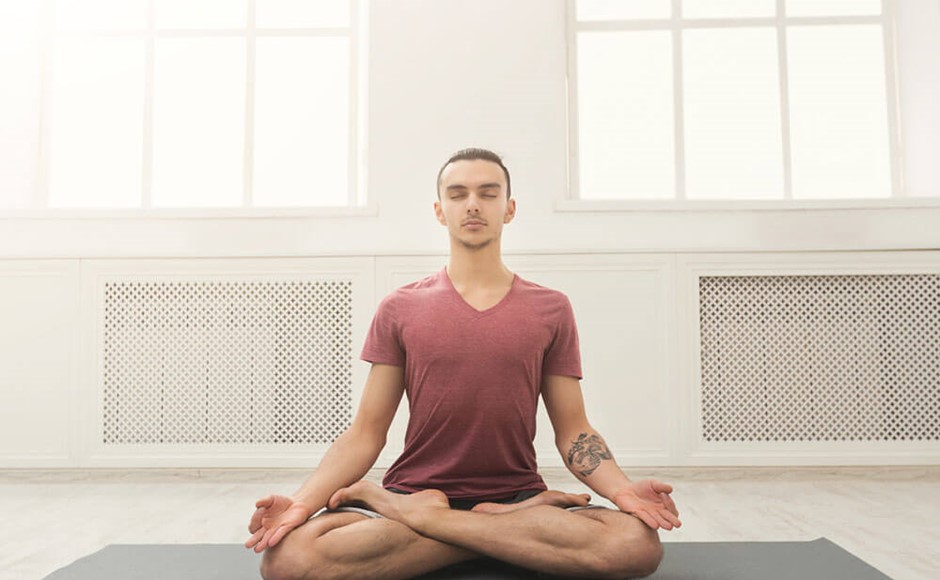
Sit erect and stretch your legs out in front of you. Bend one leg to place the foot on the thigh of the other, the sole facing upwards. Similarly, bend the other leg too, so that the heels are opposite each other and placed in such a way that they press down on the other side of the groin. Keep your neck, head and spine straight. Place your palms one upon the other, both turned upward and cupped, and rest them on the upturned heels a little below the navel.
3. Yogamudra
The practice of this asana tones up the nervous system, buids up powerful abdominal muscles and strengthens the pelvic organs. It helps pep up digestion, boosts the appetite and removes constipation. It provides relief in gas trouble, flatulence and lumbago. It tones up and relaxes the nerves of the head and face. It also strengthens the sex glands.
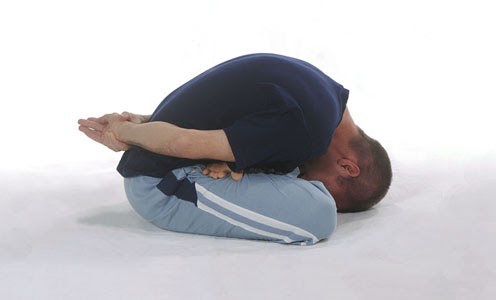
Sit erect in padmasana. Fold your hands behind your back, holding your left wrist with the right hand. Take a deep breath. While exhaling, bend forward slowly keeping your hands on your back. Bring your face downwards until your nose and forehand touch the floor. While inhaling, slowly rise back to the upright position.
4. Vajrasana (Pelvic Pose)
Vajrasana can be performed even after meals. It improves the digestion and is beneficial in cases of dyspepsia, constipation, colitis, seminal weakness and stiffness of the legs. It strengthens the hips, thighs, knees, calves, ankles and toes.
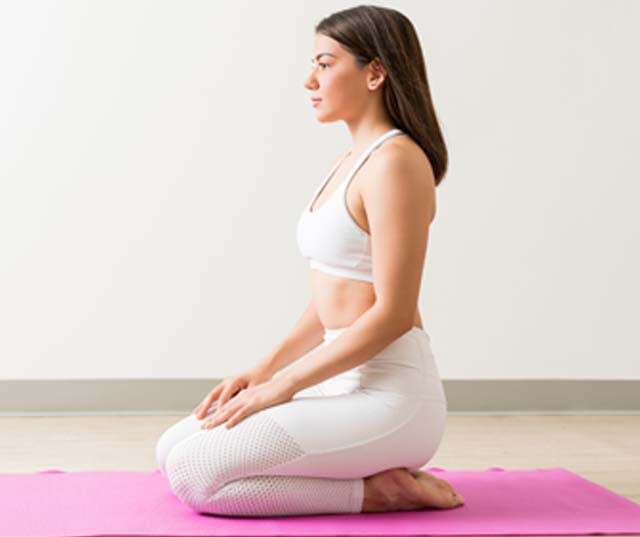
Sit erect and stretch out your legs. Fold your legs back, placing the feet on the sides of the buttocks with the soles facing back and upwards. Rest your buttocks on the floor between your heels. The toes of both feet should touch. Now, place your hands on your knees and keep the spine, neck and head straight.
5. Shirshasana (Topsyturvy pose)
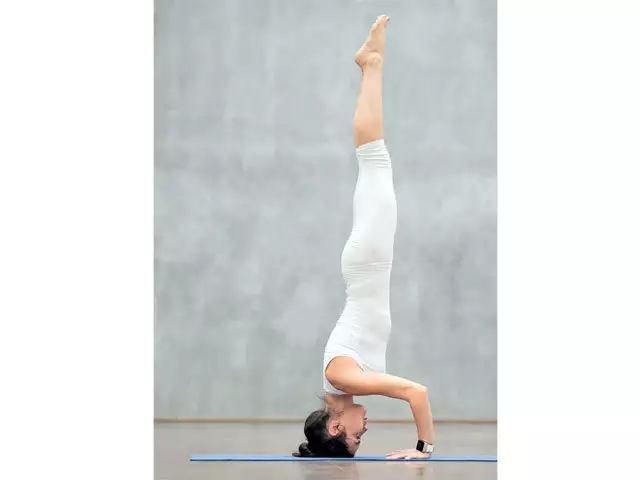
Regular practice of shirshasana will benefit the nervous, circulatory, respiratory, digestive, excretory and endocrine systems. The asana helps cases of dyspepsia, seminal weakness, varicose veins, arteriosclerosis, jaundice, renal colic and congested liver. Those suffering from oozing from the ears, iritis, high blood pressure or a weak heart should not practice this asana.
Shirsha means ‘head’. In this asana, one stands on one’s head. Kneel on the ground, interlocking the fingers of both hands. Place the fingerlock on the ground in front of you, keeping the elbows apart. Support your head on the fingerlock. Start raising your knees one at a time to the chest level. Then raise your feet slowly so that the calf muscles touch the thighs. Breathe normally. This is the first stage which should be done perfectly as the balance of the final posture depends mainly on this stage. Next, raise your knees first and then slowly raise the feet so that the whole body is straight, like a pillar. This is the final pose. Return to the original position by reversing the order, step by step.
This asana should not be done jerkily. The important factor in Shirshasana is mastering the balance, which comes through gradual practice. For proper balance, elbows should be placed firmly on the ground, alongside the fingerlock. Initially the asana should be done for 10 seconds only. The duration may be gradually increased by a further 10 seconds each week.
6. Viparitakarani (Inverted Action Pose)
Through this asana, the muscles of the neck become stronger and blood circulation is improved. The functioning of the cervical nerves, ganglia and the thyroid also gets improved.
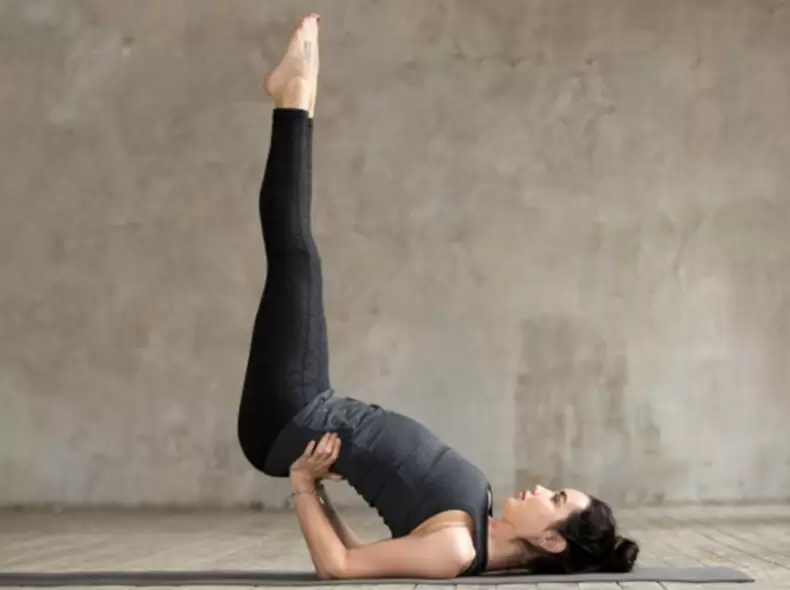
Lie flat on your back, with your feet together and arms by your side. Press your palms down, raising your legs to a perpendicular position without bending the knees. Your palms should touch the waist. Then straighten your legs. The trunk should not make a right angle with the ground but simply an upward slanting position. The chest should not press against the chin but be kept a little away. To return to the ground, bring your legs down slowly, evenly balancing your weight.
7. Sarvangasana (Shoulder stand pose)
In Sanskrit ‘sarva’ means whole and ‘anga’ means limb. Almost all parts of the body are involved in and benefit from this asana. It helps relieve bronchitis, dyspepsia, varicose veins and peps up the digestion. It stimulates the thyroid and para-thyroid glands, influences the brain, heart and lungs.It helps lymphatic juices to circulate in the brain and strengthens the mind. This asana should not be done by those suffering from high blood pressure, heart disease and eye trouble.
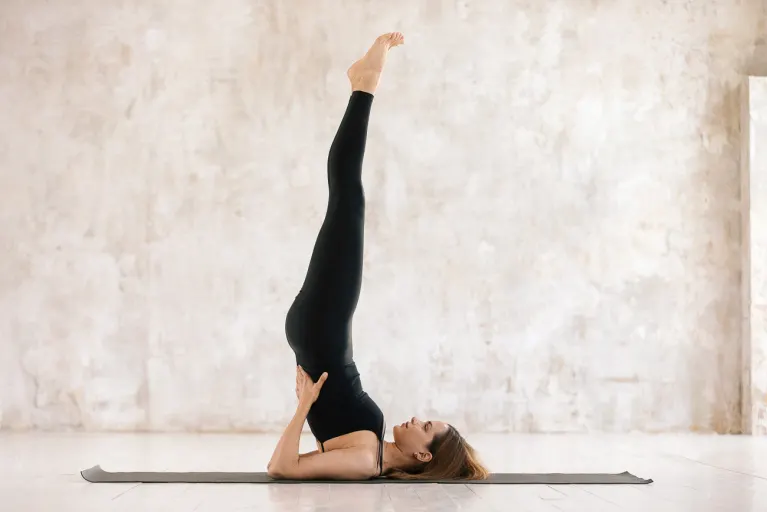
Lie flat on your back with your arms by the side, palms turned down. Bring your legs up slowly to a 90 degree angle and then raise the rest of the body by pushing the legs up and resting their weight on the arms. Fix your chin in jugular notch, and use your arms and hands to support the body at the hip region. The weight of the body should rest on your head, back and shoulders, your arms being used merely for balance. The trunk and legs should be in a straight line. The body, legs, hips and trunk should be kept as vertical as possible. Focus your eyes on your big toes. Press your chin against your chest. Hold the pose for one to three minutes. Return to the starting position slowly reversing the procedure.
8. Matsyasana (Fish Pose)
Matsyasana is beneficial in the treatment of acidity, constipation, diabetes, asthma, bronchitis and other lung disorders.
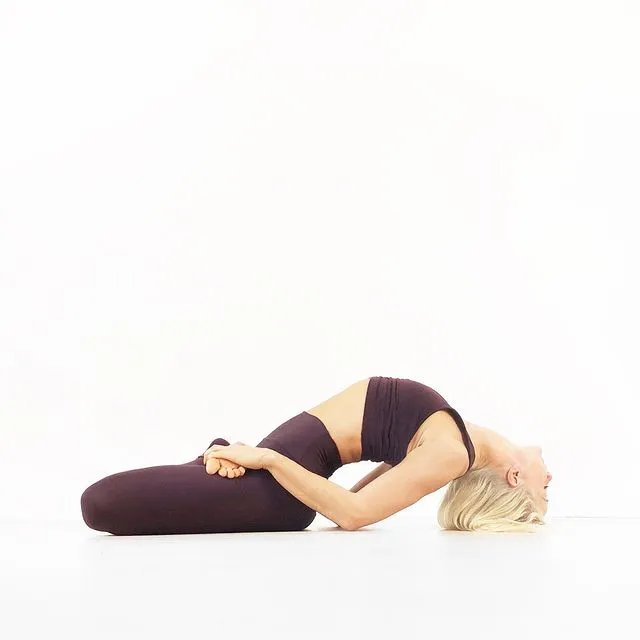
Sit in padmasana. Bend backwards and lie flat on your back without raising your knees. Press your palms beneath the shoulder. Push the hip backwards thus making a bridge-like arch with the spine. Then making hooks of your forefingers, grasp your toes without crossing your arms. Maintain this pose and breath rhythmically and comfortably. Reverse the order and return gradually to the starting position of padamasana.
9. Uttanapadasana (Leg-lifting pose)
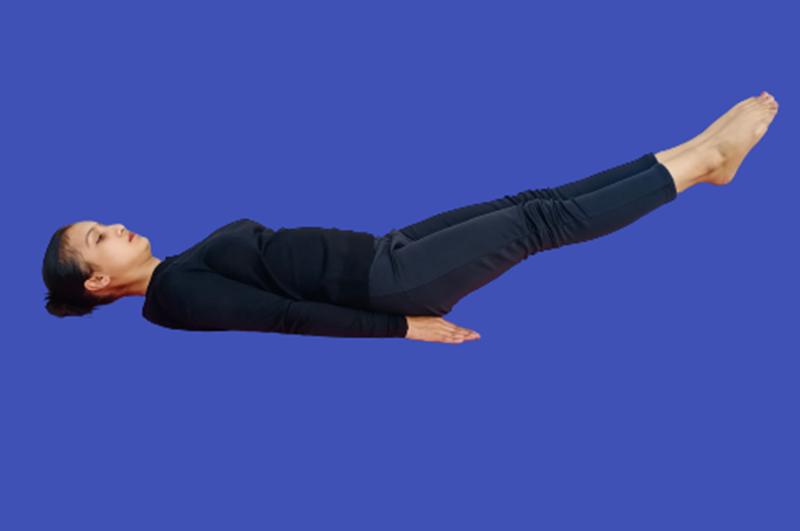
Lie on your back with legs and and arms straight, feet together, palms facing downwards, on the floor close to the body. Raise your legs about two feet from the floor without bending your knees. Maintain this pose for sometime. Then, lower your legs slowly without bending the knees. This asana is helpful for those suffering from constipation. It strengthens the abdominal muscles and intestinal organs.
10. Halasana (Plough pose)
This asana relieves tension in the back, neck and legs and is beneficial in the treatment of lumbago, spinal rigidity and rheumatism, myalgia, arthritis, sciatica and asthma.
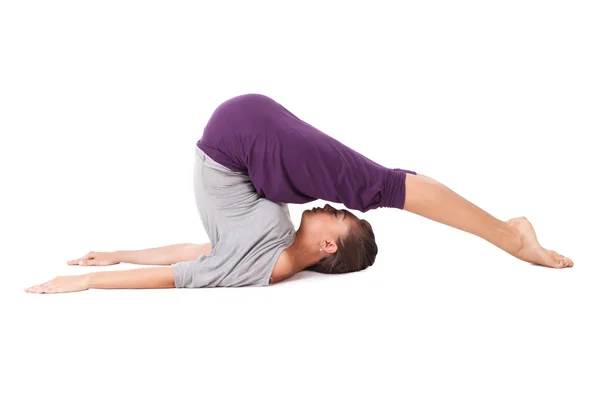
Lie flat on your back with legs and feet together, arms by your side with fists closed near your thigh keeping your legs straight, slowly raise them to angles of 30, 60 and 90 degrees, pausing slightly at each point. Gradually raise your legs above your head without bending your knees and move them behind until they touch the floor. Stretch your legs as far as possible so that your chin presses tightly against the chest while your arms remain on the floor as in the original positio. Hold the pose from between 10 seconds to three minutes, breathing normally. To return to the starting position slowly reverse the procedure.
11. Bhujangasana (Cobra Pose)
This asana has great therapeutic value in the treatment of diseases like cervical spondylitis, bronchitis, asthma and eosinophilia. It removes weakness of the abdomen and tones up the reproductive system in women. It exercises the vertebrae, back muscles and the spine.
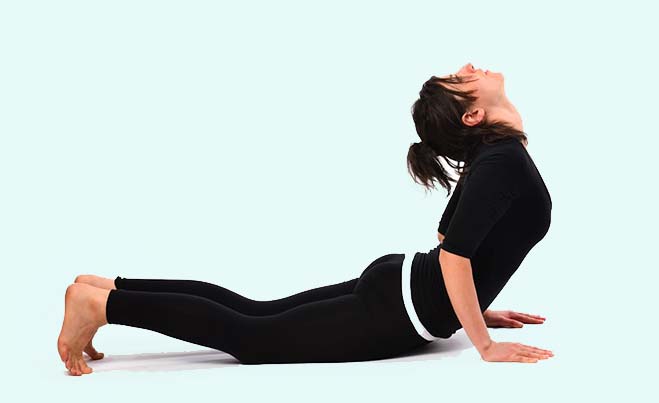
Lie on your stomach with your legs straight and feet together, toes pointing backwards. Rest your forehead and nose on the ground. Place your palms below the shoulders and your arms by the side of the chest. Inhale and slowly raise your head, neck, chest and upper abdomen from the navel up. Bend your spine back and arch your back as far as you can looking upwards. Maintain this position and hold your breath for a few seconds. Exhale, and slowly return to the original position.
12. Shalabhasana (Locust Pose)
This asana helps in the treatment of arthritis, rheumatism and low backache. The whole body is strengthened by this asnana especially the waist, chest, back and neck. Persons suffering from high blood pressure or heart diseases should not practice this asana.
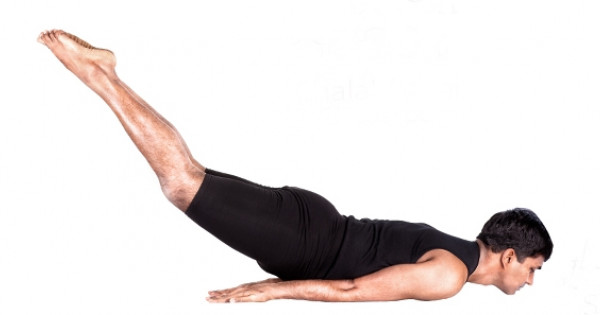
Lie flat on your stomach, with your legs stretched out straight, feet together, chin and nose resting on the ground, looking straight ahead. Move your arms under the body, keeping them straight, fold your hands into fists and place them close to the thighs. Now, raise your legs up keeping them straight together and stretching them as far back as possible without bending your knees and toes. Hold this position for a few seconds and repeat four or five times.
13. Dhanurasana (Bow Pose)
It provides good exercise for the arms, shoulders, legs, ankles, back and neck. It also strengthens the spine. It relieves flatulence and constipation and improves the functioning of the pancreas and the intestines. It should not be done by those with a weak heart, high blood pressure and ulcers of the stomach and bowels.
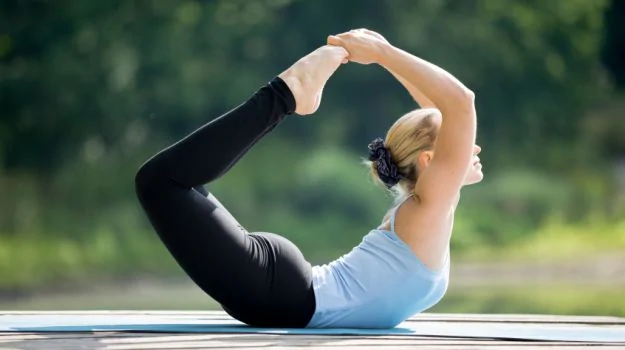
Lie on your stomach with your chin resting on the ground, arms extended alongside the body with the legs straight. Bend your legs back towards the hips, bring them forward and grasp your ankles. Inhale and raise your thighs, chest and head at the same time. Keep your hands straight. The weight of the body should rest mainly on the navel region. Therefore, arch your spine as much as possible. Exhale and return slowly to the starting position, by reversing the procedure.
14. Makarasana (Crocodile pose)
This asana completely relaxes both the body and the mind and also rests the muscles. It is beneficial in the treatment of hypertension, heart disease and mental disorders.
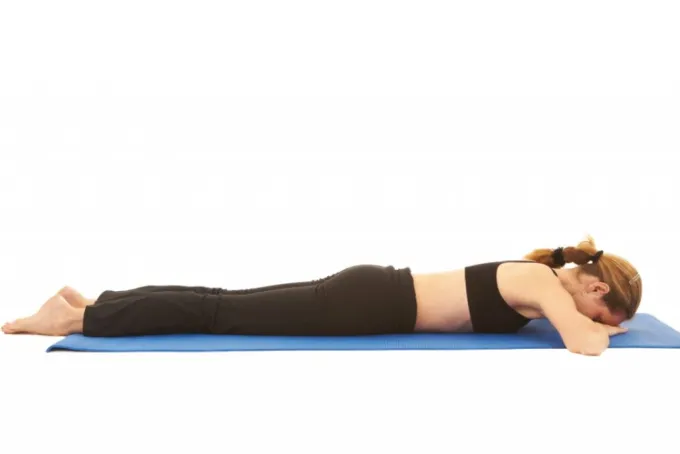
Lie flat on your abdomen. Spread your legs, with heels pointing towards each other. Bring your left hand under the right shoulder and grasp it. Grasp the left shoulder with your right hand, keeping the elbows together, one upon the other on the ground. Your face should be between your crossed hands. Relax and breathe normally for two or three minutes. Then gradually go back to the sitting position.
15. Vakrasana
This asana tones up the spinal and abdominal muscles and nerves and activates the kidneys, intestines, stomach, adrenaline and gonad glands. It relieves cases of constipation and dyspepsia.
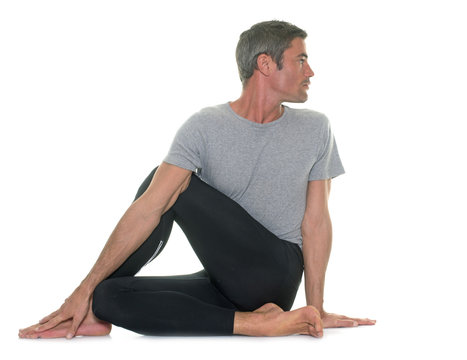
Sit erect and stretch legs out. Raise your right knee until your foot rests by the side of the left knee. Place your right hand behind your back without twisting the trunk too much. Then bring your left arm from in front of you over the right knee. Place your left palm on the ground near the heel of your right foot. Push your right knee as far to the left arm. Twist your trunk to the right as much as possible. Turn your face to the right over the right shoulder. Release and repeat on the left side.
16. Ardhamatsyendrasana
This is the half position of matsyendrasana, which is named after the great sage Matsyendra. This asana exercises the vertebrae and keeps them in good shape. It helps the liver, spleen, bladder, pancreas, intestines and other abdominal organs, and also stretches and strengthens the spinal nerves. This asana is beneficial in the treatment of obesity, dyspepsia, asthma and diabetes.
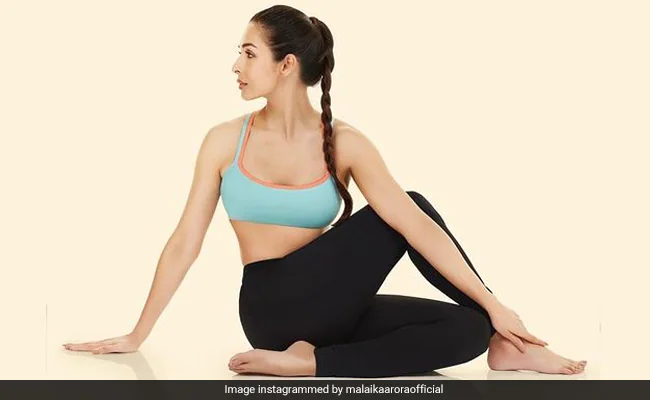
Sit erect on the ground, stretching your legs in front of you. Insert your left heel in the perineum, keeping the left thigh straight. Place your right foot flat on the floor, crossing the left knee. Pass your left arm over the right knee and grasp the big toe of your right foot. Grasp your left thigh from the rear with your right hand. Turn your head, neck, shoulders and trunk to the right bringing your chin in line with the right shoulder. Maintain the position for a few seconds, gradually increasing the duration to 2 minutes. Repeat the same process on the other side for the same duration.
17. Paschimottanasana (Posterior stretching pose)
It is a good stretching exercise in which the posterior muscles get stretched and relaxed. It relieves sciatica, muscular rheumatism of the back, backache, lumbago and asthmatic attacks. It is also valuable in constipation, dyspepsia and other abdominal disorders.
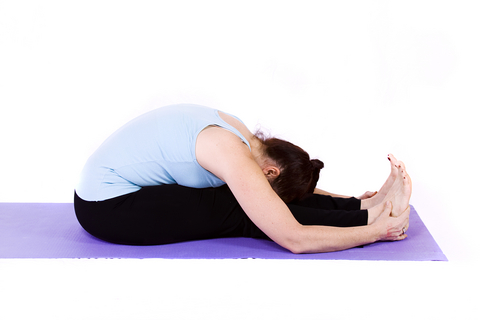
Sit erect. Stretch your legs out in front of you, keeping them close to each other. Bend your trunk and head forward from the waist without bending your knees and grasp the big toes with your fingers. Holding your toes, and without bending your knees, rest your forehead on your knees. With practice, the tense muscles become supple enough for this exercise. Old person and persons whose spine is still should do this asana slowly in the initial stages. The final pose need to be maintained only for a few seconds. Return to the starting position gradually.
18. Gomukhasana (Cow-face pose)
The practice of gomukhasana will strengthen the muscles of the upper arm, shoulder, chest, back, waist and thigh. It is beneficial in the treatment of seminal weakness, piles, urethral disorders and kidney troubles. It also relieves varicose veins and sciatica.
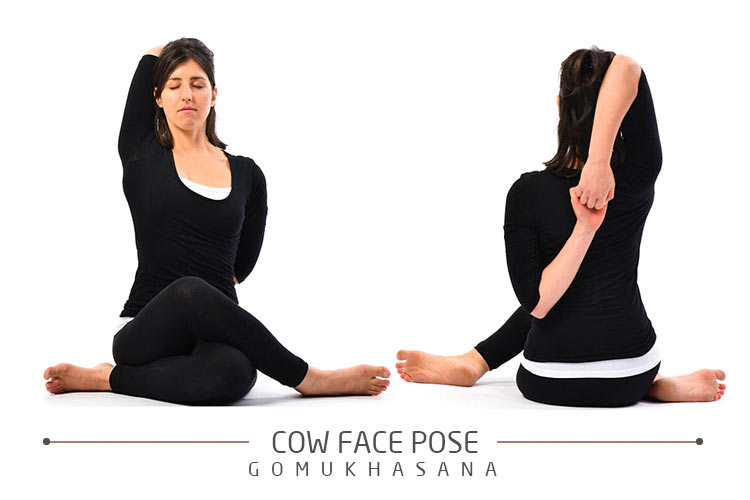
Sit erect on the floor, with your legs outstretched. Fold your left leg back. Place your left foot under the right hip. Similarly, fold back the right leg and cross your right foot over your left thigh. Place your right heel against the left hip. Both soles should face backwards, one over the other. Now interlock your hands behind your back. See to it that if your right leg is over the left, then your right elbow should face upward and the left elbow downward. This position is reversed when the leg position is changed. Hold the pose for 30 seconds and then repeat the procedure reversing the process.
19. Pavanamukhtasana (Gas-releasing pose)
This asana strengthens the abdominal muscles and internal abdominal organs like the liver, spleen, pancreas and stomach. It helps release excessive gas from the abdomen and relieves flatulence. Persons suffering from constipation should do this exercise in the morning after drinking lukewarm water to help proper evacuation of the bowels.
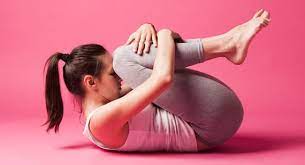
Lie flat on your back, hands by your side. Fold your legs back, placing your feet flat on the floor; make a fingerlock with your hands and place them a little below the knees. Bring your thighs up near your chest. Exhale and raise your head and shoulders and bring your nose between your knees. This is the final position. Maintain this pose for a few seconds and repeat three to five times. Reverse the procedure to get back to the original position.
20. Chakrasana (Lateral Bending Pose)
This asana includes maximum stretching of the lateral muscles of the body, especially the abdomen. It strengthens the knees, arms and shoulders and increases lung capacity.
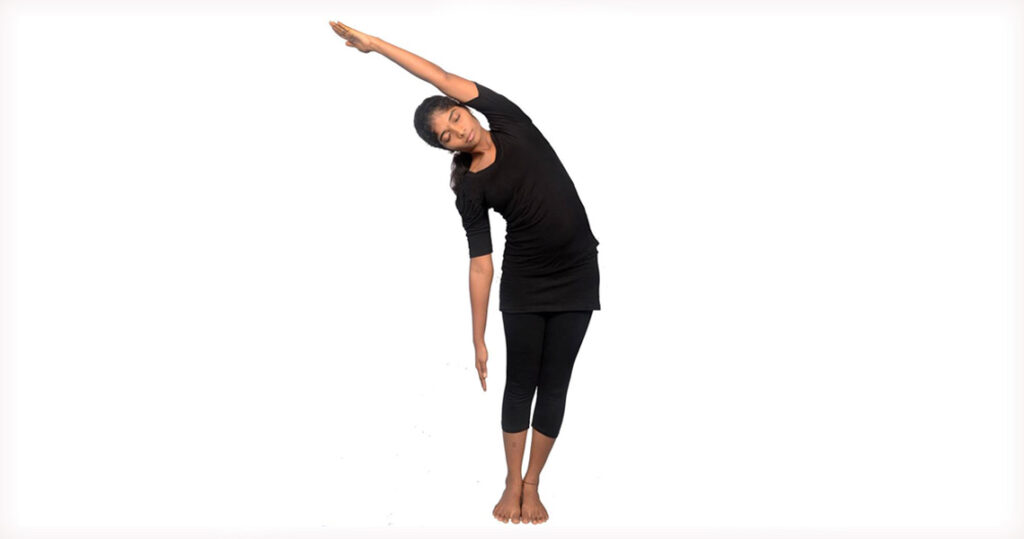
Stand straight with your feet and toes together and arms by your sides, palms facing and touching the thighs. Raise one arm laterally above the head with the palm inwards up to shoulder level and palm upwards when the arm rises above the level of your head. Then, bend your trunk and head sideways with the raised arm touching the ear, and sliding the palm of the other hand downwards towards the knee. Keep your knees and elbows straight throughout. Maintain the final pose for a few seconds. Then gradually bring your hand back to the normal position. Repeat the exercise on the other side.
21. Trikonasana (Triangle Pose)
Trikonasana is an all-round stretching exercise. It keeps the spinal column flexible and reduces the fat on the lateral sides of the body. Besides, it stimulates the adrenal glands and tones up the abdominal and pelvic organs.
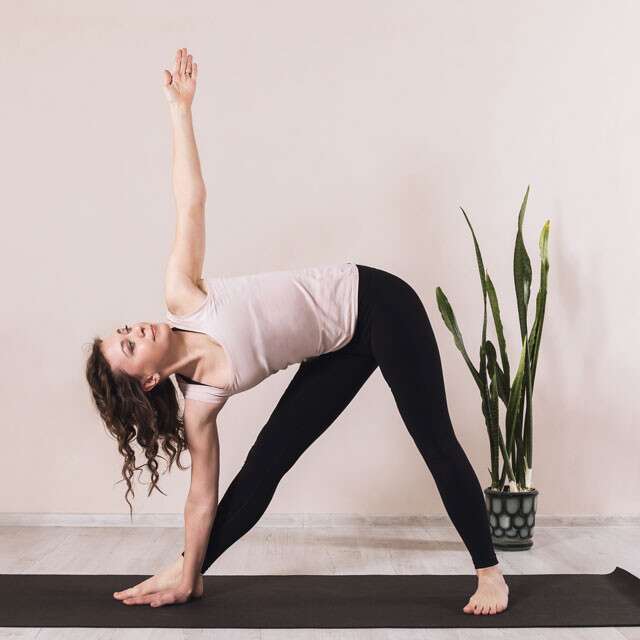
Stand erect, with your legs apart. Stretch your arms upto shoulder level. Bend your trunk forwards and twist to the left, looking upwards and keeping your left arm raised at an angle of 90 degrees. Place your right palm on your left foot without bending the knees. Maintain this pose for a few seconds. Then straighten up and return to the normal position. Repeat the procedure on the other side.
Pranayama
Prana means ‘vital force’ and Ayana means ‘control’ in Sanskrit. Thus Pranayama means the control of the vital force through concentration and regulated breathing. By means of controlled breathing that is, inhaling and exhaling by holding the breath for a fixed time and changing the rhythm of inspiration and expiration. It is possible to influence the life-force in the body. Pranayama is the process by which such conscious control is achieved through controlled and rhythmical breathing.
The best position in which to practice pranayama is the padamasana or lotus pose. If for some reason that position is difficult to adopt, it can be done while sitting in any comfortable pose. The important thing is to keep the back, neck and head in a straight line. The body should be in its natural relaxed condition and this can be achieved by resting a few minutes in shavasan.
In practising pranayama, a ratio of two to one should be maintained throughout, that is, the exhalation time should be double that required for inhalation. Some varieties of pranayama benficial in the treatment of common ailments are as follows :-
1. Anuloma-viloma
This is also known as Nadishuddhi pranayama. This pranayama is a process of purification. It strengthens the lungs and calms the nerves. It helps cur cough and cold, insomania, chronic headache and asthma.
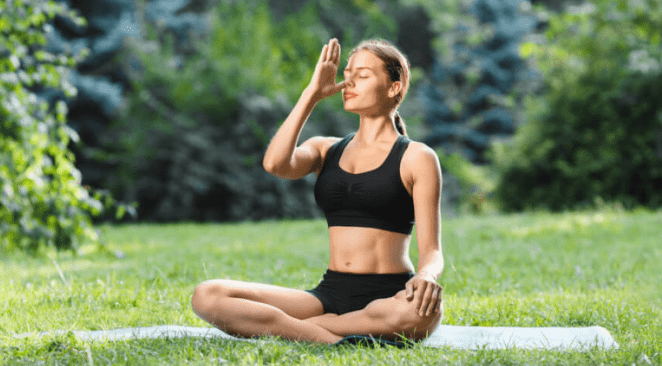
Sit in any comfortable meditative pose, keeping your head, neck, and spine erect. Rest your left hand on your left knee. Close your right nostril by pressing the tip of your right thumb against it. Breathe out slowly through the left nostril. Inhale slowly and deeply through the left nostril, keeping the right nostril closed. Close your left nostril with with the little finger and ring finger of your right hand and exhale through the right nostril. Then inhale through the right nostril, keeping the left nostril closed and, lastly, exhale through the left nostril, keeping the right nostril closed.This completes one round of anuloma-viloma. Repeat the entire process. Inhaling and exhaling should be done very slowly, without making any sound.
2. Ujjayi
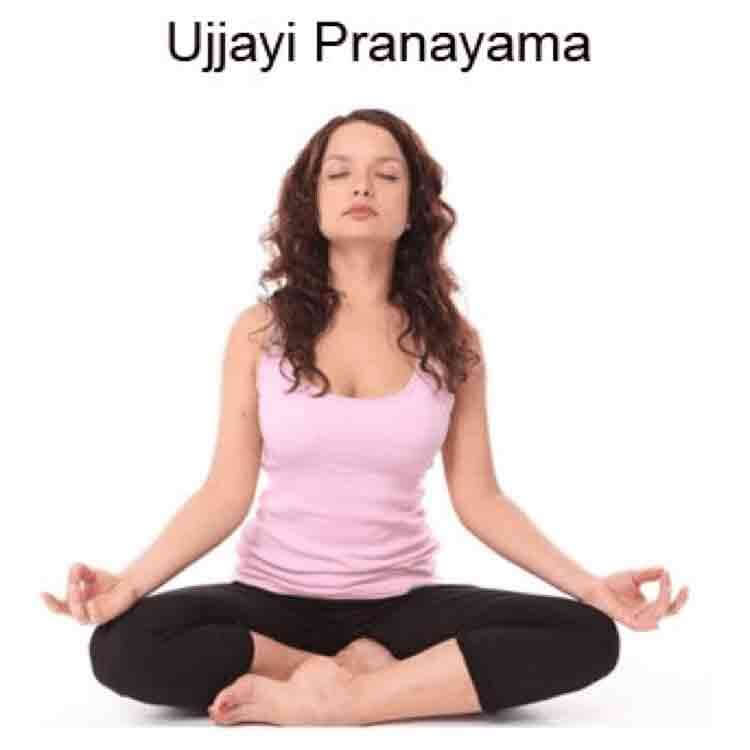
Sit in any comfortable meditative pose. Inhale slowly, deeply and steadily through both nostrils with a low uniform sound through the glottis. Hold your breath for a second or two after inhaling and then exhale noisily only through the left nostril keeping the right nostril closed. Do this as often as required. This pranayama clears the nasal passage and helps the functioning of the thyroid gland and benefits respiratory disorders, especially bronchitis and asthma. Persons suffering from high blood pressure should not practice ujjayi.
3. Bhastrika
Bhastrika means ‘bellows’. It is performed by instant and quick expirations of breath. There are many varieties of bhastrika. The simplest technique is as follows : Sit in Padmasana. Do 20 strokes of kapalbhati. Inhale and exhale rapidly, making a puffing sound. This is a good exercise for abdominal viscera and lungs.
4. Sheetali
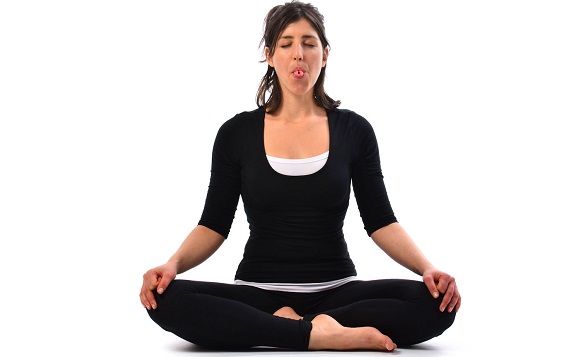
Sit in padmasana or any other comfortable posture. Stick your tongue out about an inch from the lips, rolled up at the sides to form a channel like a bird’s beak. Such in air through this channel. After a full inhalation, slowly close your mouth, hold your breath and exhale slowly through both nostrils. This completes the exercise. Repeat as required. This pranayama cools the body and mind, activates the liver and bile and has beneficial effects on the circulation and body temperature.
5. Sitkari
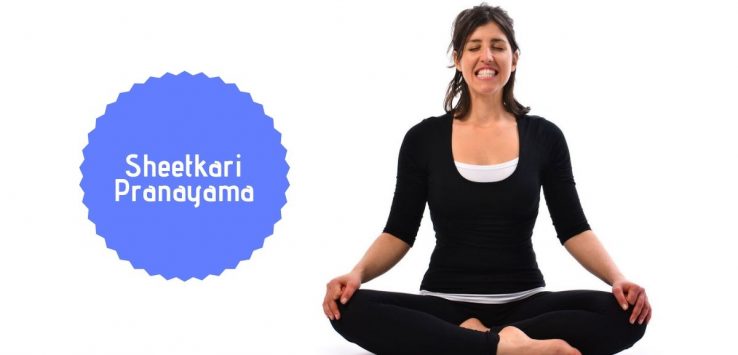
In sitkari a sound is produced while inhaling by opening the mouth a little, placing the tip of the tongue against the lower front teeth and then sucking the air in slowly. After holding your breath, exhale through both nostrils. This exercise helps to control thirst, hunger and laziness.
6. Suryabhedan
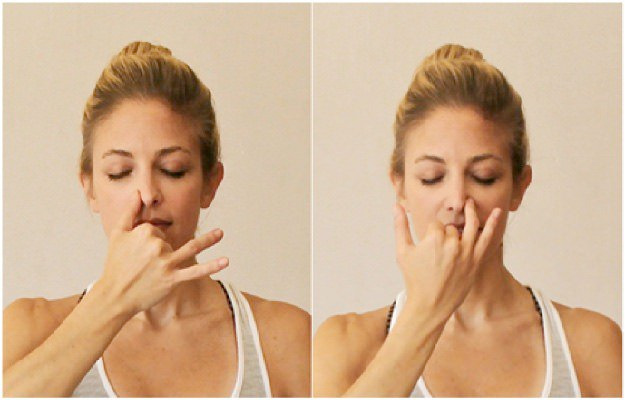
‘Surya-nadi’ is the right nostril and ‘Chandra-nadi’ is the left nostril. In this pranayama, one always uses the right nostril for inhalation. Sit in Padamasan or any other suitable posture. Keep your head, neck and back straight. Inhale through the right nostril. Hold your breath and then exhale through the left nostril. Repeat as often as required. This pranayama increases gastric juices and helps digestion. It also fortifies the nervous system and clears the sinuses.
7. Bhramari
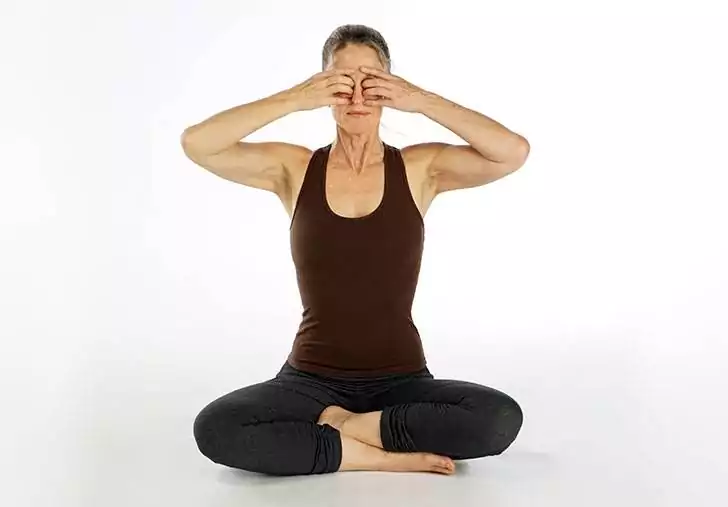
In this pranayama, the buzzing sound of a bee is produced and hence it is called bhramari. Keep your mouth closed while inhaling. Exhale through both nostrils, producing the humming sound of bee. This pranayama affects the ears, nose, eyes and mouth and makes the complexion glow. It also help those suffering from insomnia.

